
This is my English translation of the 1954 German owners manual found here: https://dkwautounionproject.blogspot.com/2017/07/1953-dkw-f89p-meisterklasse-german.html
Interestingly, this later version of the F89P appears to use a distributor ignition system.
Introduction
The DKW Meisterklasse, which you have just purchased, represents a further development in the area of the two-strokes. It is both an elegant and progressive vehicle. The finished form, the comfortable interior, the excellent handling, the easy shifting, the flexibility of the machine, the stability when driving and the smooth curves will surely inspire you. This mature construction ensures constant operational readiness with maximum economic efficiency.
In addition, as a DKW owner you will enjoy various other advantages such as:
1. Constant care of your DKW by our widely distributed DKW service organization. Just look for the DKW Service Shield below;
2. Time and cost-saving DKW exchange services;
3. The fulfillment of your special needs by using our tried and tested DKW special accessories.
To preserve the value of your car attention should be paid to the regular execution of servicing and maintenance. In our DKW workshops you will always have access to staff trained at our DKW factory. DKWs special purpose machines, specially developed in the factory, are used along with original DKW spare parts.
On all journeys the DKW masterclass is accompanied by the DKW service organization.
With regular contact with our distributors and workshops, you will soon feel a welcome member of our large DKW family. The observance of these notes, advice and explanations given on the following pages, will be of great use.
Page 6
Operation of the car
Importance of the vehicle letter, specification and what you must know for registration.
The certificate of the motor vehicle - the certificate of birth of the car – must be submitted to the licensing office (now TUV in Germany) with the application for vehicle registration and liability insurance card, and is returned to the vehicle owner upon approval.
The car letter should never to be carried along with the vehicle papers, but must always be safely picked up at home. All the basic technical modifications to your approved vehicle are to be reported to the licensing office immediately for updating the motor vehicle registration records. Likewise, every change of residence of the vehicle owner must be reported without delay to the licensing authority.
The warranty card
The Customer Service Department will send the required form to Auto Union GmbH, Spare Parts and Customer Service, Ingolstadt, to obtain the warranty card.
Do not forget to take your DKW following papers:
Car papers
Service papers
Customer Service directory
Battery guarantee
Radio guarantee
If radio is installed (do not forget your car radio license). In addition, check the toolbox located in the luggage compartment for completeness as stated in the last page of the customer service booklet.
Page 7
The dates of birth of your car are entered in your vehicle documents. It is important, however, that if they are asked for by the police, or when you cross the border, you know where they are mounted on the car.
The Type plate

Open the bonnet and standing in front of the car, you will see the Type plate to the left of the battery.
The Chassis Number

The chassis number can be found in the middle of the engine compartment at the base of the radiator cross member.
The Motor Number

The motor number can be found on the front left-hand side of the engine block.
Page 8
Operating levers and controls

A look at the richly equipped dashboard reveals the care which has come from long experience, where everything has been considered which increases driving comfort. All operating levers are comfortably close to hand, all control gauges and indicators are in the field of view of the driver!
1. Socket for the hand lamp or cigarette lighter
2. Starter gas lever
3. Light controls – standing lights (half). Full lights (pull out)
4. Ventilator lever
5. Dashboard and gauge light switch
6. Windscreen wiper lever
7. Clock with winding knob
8. Indicator / trafficator light (red)
9. Radiator temperature gauge
10. Radiator temperature warning light (blue)
11. Petrol indicator
12. Button for the petrol indicator
13. Speedometer and tachometer
14. Indicator switch
15. Signal knob
16. Window winder
17. Seat position lever
18. Vent window lock
19. Handbrake
20. Free wheel device
21. Headlight dimmer switch (for high beams)
22. Gear lever
23. Clutch pedal
24. Brake pedal
25. Accelerator
26. Heater control
27. Heater channel controls
28. Starter button

Even if you are already an old DKW driver, take a few minutes to get to know your new DKW and learn how to use it properly.
Page 10
Before your first drive
Fuel tank: the fuel cap is located on the right side of the luggage compartment. The fuel tank’s capacity is 32 litres with a 5.5 litre reserve.
A glance at the fuel gauge makes sure there is sufficient fuel in the tank. When the button underneath the fuel gauge is pulled, after approximately 30 seconds a light will flash indicating the approximate level of the tank. For instance, when the 20 litre mark flashes, then the fuel tank has less than 20 liters. If the 10 litre mark flashes, then the fuel tank has less than 10 litres of fuel-oil mixture.

If the reserve is opened, the label "RES" appears on the fuel indicator. This is a self-acting indicator. That is, it lights up without pushing the button. It is recommended you visit the next petrol station since the remaining fuel quantity is only sufficient for a distance of about 50km.
It is important that you know the exact mixing ratio of the fuel and also when the DKW two-stroke fuel additive Desolite K should be added to the fuel. From the table you can see the exact ratios for the different fuel quantities.

The mixing ratio of oil and petrol is always 1:25 even during the break-in period.
Never forget: your DKW two-stroke two-cylinder engine must always be refueled with a petroil ratio of 1:25 and a 2% addition of Desolite K.

Use only good, clean and water-free brand fuels and quality motor oil with a SAE-rating 40.
As far as the two-stroke or premium oil companies mentioned in the lubrication oil table are concerned, there are no reservations against their use. The use of DKW branded lubricants is not necessary, however, you should not use oils inferior to those mentioned in the lubrication oil table.
Always make sure that the fuel is properly mixed with the oil by using a mixing pot. Only self-mixing two-stroke motor oil with corrosion protection may be filled separately.
When the fuel filter has been drained, do not fill the almost empty fuel tank with a so-called self-mixing oil. Rather, fill with gasoline until almost full and only then add the self-mixing oil. This ensures that the oil is evenly distributed through the tank.

The best guarantee for ensuring an even fuel-oil mixture and thus avoiding operating disturbances is to use mixing jug when refueling.
Due to the special nature of today's fuel, it can lead to rust formation on the engine components under certain operating conditions. This phenomenon can occur when the engine is frequently under-cooled, but it can be prevented by the regular use of DKW two-stroke fuel additive Desolite K. This also reduces the formation of combustion residues on the piston base, in the cylinder head, and in the exhaust system. Desolite K can be obtained in any DKW workshop, in one, half, and quarter litre cans. Each can has a cap which is designed as a measuring cup.
Tire air pressure:
Special attention should also be given to the tire pressure of your DKW Meisterklasse. Too low or too high air pressure adversely affects the excellent driving characteristics of the DKW Meisterklasse and leads to premature tire wear. Check the tire pressure with an air pressure tester from time to time. The prescribed values are:
• Normal driving: Front and rear 1.4 atu
• For a driver with 4 people and luggage the rear wheels up to 1.7 atu.
Page 12
Radiator

Before embarking on a trip you should check whether there is sufficient water in the cooling system. The water must be at the bottom edge of the filler neck. (When using anti-freeze the level should be about 4cm below the bottom edge of the filler neck).
Brakes
Before beginning any journey please check the brakes are in working order.
The ignition

The ignition is switched on by inserting the ignition key into the lock and turning it a quarter turn to the right. The red control lamp will light up. The foot starter switch can now be activated.
To switch off the engine the ignition key is turned a quarter turn back to the left.
In this ignition key position, which is referred to as the parking position, the ignition key can be withdrawn without the steering being blocked. If you want to turn off your car and lock it by blocking the steering wheel at the same time, then you have to turn the key back up the vertical position and remove the key from the ignition. The steering is now locked
Choke (Starter device)

Choke should only be applied when starting cold. When the choke is pulled out the starting gasifier gives the engine a richer mixture to help it start. Do not use the choke when the engine is warm.
Gears
In the DKW Meisterklasse, the gearshift lever is located in the centre of the dashboard. The indicator switch is attached to the steering column.

The position of the individual gears is as follows:
Shift lever back towards the steering wheel
To the left – first gear
To the right – second gear
Shift level forward towards the dashboard:
To the left – third gear
To the right – fourth gear
To reverse – pull the lever towards the steering wheel all the way out and turn full lock to the right
For the indicator switch on the steering column
To the top = left indicator
To the bottom = right indicator
The freewheel control knob is located beneath the dashboard next to the steering column.
To activate:
Up and lock to the right = freewheel engaged
Down and lock to the right = freewheel disengaged
Your first drive
Now that you are familiar with the control levers and instruments, the car itself is ready for driving. The first ride with your DKW Meisterklasse can now begin
The starter

Make sure that the gear shift is in the neutral position. With the key switched to ignition on position, press the starter button on the floor with your foot. Do not forget to push the starter choke in as soon as the engine "runs." If the engine is warm the starting gasifier must not be charged and no gas must be given.
If you have pulled the starting gasifier knob out and the engine does not start, press the accelerator pedal in completely. If the engine still does not start, the spark plugs must be unscrewed and dried with a towel. With the spark plugs out allow the engine to rotate a few turns with the Dynastart, so that the mixture becomes more ignitable.
Shifting gears

With your left foot, push the clutch pedal all the way in. With your right hand, pull the gear lever from its idle position towards you (ie, in the direction of the steering wheel) until resistance occurs and then turn the handle to the left. Now give the right foot a little gas and slowly release the clutch pedal. The car begins to move. After reaching a speed of 15 to 20 kph, remove your foot from the gas, depress the clutch pedal and engage the second gear. When shifting from 1st to 2nd gear, the shift lever is left in the same plane, but the handle is turned to the right (ie, moved from the left to the right). From the 2nd gear, after reaching a speed of about 35 kph, change to the 3rd gear. As usual, the gas is removed and the clutch depressed and the gear level is moved to neutral for a short pause, and then pushed inwards towards the dashboard until you reach the indicator mark on the gear shift lever. The gear lever is then turned to the left into the 3rd gear. The 4th gear shift obtained by pushing the lever over to the right in the same plane (nearer the dashboard) as the 3rd gear position. After passing the neutral position you will find 4th gear on the right.
Switching down gears
A completely silent and easy down shift can be achieved by proceeding as follows:
If in 4th gear and the speed drops below 45 kph, remove the throttle, push in the clutch pedal and place the gear lever in the idle position, release the clutch pedal, then briefly press the clutch pedal again and move the gear shift to 3rd gear position. This is known as double de-clutching. In the same way, switch from 3rd to 2nd gear when the speed falls below 30 kph. In doing so, you must lift the lever in the idle position towards the steering wheel until it is locked and pressed to the right.
Shift down from 2nd to 1st gear when the speed falls below 10 kph. In exactly the same way as described above, turn the lever from the 2nd gear, from the right to the left via the idle position.
You can only switch to reverse gear when the car is at a standstill. For this purpose, the lever is to be pulled upwards toward the steering wheel while in the idle position until the gear shift is at full lock and then turn to the right.
After your first ride in your DKW Meisterklasse you will be satisfied with the smooth and easy gear change offered by the transmission.
Driving with the free-wheel

When the freewheel is switched on, i.e. the freewheel lever is inserted to the upper right, then the flow of force from the engine to the drive is interrupted as soon as you remove gas. The braking effect of the engine is not present. In the case of a wet road, blue asphalt, smooth ice and steep descents, the freewheel should be disengaged so the braking effect of the engine can be used. (See technical specification)
The Handbrake

If the car is to be secured against rolling away, the handbrake must be engaged. In the case of stopping on a slope it is advisable to also insert the 1st gear or reverse gear as well as to lock the freewheel.
Running in made easy!
The most remarkable advantages of any DKW engine are undoubtedly the very simplified running in procedure. There are no special driving restrictions, but we do recommend that you take note of the few points that influence the life of your engine:

Do not exceed the following speeds during the first 500 km:
1st gear 15kph
2nd gear 30kph
3rd gear 50kph
4th gear 80 kph
During the first 500 km do not drive at full throttle for more than one half to one minute, and up to 1500 km, for not more than 2-3 minutes at a time.
Always switch down in time! This applies both during the running in time and to the later driving operation. The red marks on the tachometer dial are the speed limits for the individual gears, which must not be exceeded at any time.
Maximum speed limits per gear:
1st gear 20kph
2nd gear 38kph
3rd gear 65kph
4th gear 100kph
We draw your attention to the fact that even during short drives, the engine should not be run too slowly. From starting to higher speeds, the engine should always be run at high revs. Avoid the need to climb up slopes in high gear. Fuel consumption increases and the engine temperature exceeds normal.
One of the most important features of the DKW Meisterklasse is:
When you slowly return to the desired speed with the accelerator pedal, you will notice that the car still maintains its speed. You will thus recognize that driving and fuel consumption are closely related.
Fuel consumption also depends on the correct operating temperature of the machine. The correct radiator temperature is between 70 and 90 c. This point deserves special attention, which is why we recommend the installation of a radiator roller blind during winter operation (radiator roller blinds are available as accessories).
Another important point for the running in period and for the economic efficiency of your car:
During the running in period, the freewheel should always be switched on. Even later, as we have already mentioned above, only in certain driving conditions should the free-wheeling be switched off. On long stretches, where one can leave the car coasting without gas, the free-wheel saves fuel because the momentum of the vehicle is properly utilized.
DKW Limousine with sunroof
For use of the sunroof:

Opening: - Turn the sunroof handle half a turn to the left to unlock the sunroof. The roof can now be slid back gently.
Closing: - Slide the sunroof back towards the closed position carefully so that it does not catch. Once the sunroof has been fully slid back into position, turn the sunroof handle fully to the right to lock it in place. Ensure you check the sunroof has fully closed so as to avoid water leakage into the car.
Winter driving!
In winter, you will really learn the advantages of your DKW car, particularly since it is powered by a two-stroke engine that works with fuel-oil mixture for its lubrication. There is therefore no difficulty with solidified oil in the sump. Also you can rest assured of reliable driving if you ensure that anti-freeze is added to the radiator coolant in a timely manner to prevent freezing.
The anti-freeze mixture in the radiator must not reach up to the filler neck, but 4-5 cm lower, otherwise there is a risk of overflow as the anti-freeze mixture will expand faster than pure water at high temperatures. The loss of anti-freeze will reduce the frost protection.
The Heater
The driving comfort of the DKW- Meisterklasse is increased by an effective warm air heating system. The air heated in the radiator is directed to the windscreen via two defroster ducts and through the heating flaps into the car interior. The desired amount of warm air can be adjusted by means of the handle on the left of the heater box for heating operation. Pulling on this handle, the heating is opened, pushed through in the direction of travel closed. You can increase the effect of defrost nozzles when closing the heating valve. This eliminates the necessity of the windscreen shovel with additional clear windows in the winter. Even in severe frost, the defroster system will satisfy all your requirements.
Heating Box

Points 1 and 2 = by which the hot air stream flows into the interior of the car
Points 3 = the main lever by which the heating is switched on or off
Defroster

By opening the main lever, but closing the two flaps 1 and 2, the effect of the warm air flow is increased to the windshield. In order to achieve the required cooling water temperature quickly in winter and thus also the prerequisite for a rapid heating effect, the additional installation of a radiator blind is recommended. The correct operating temperature can be controlled with this adjustable louvre.
If heating is not required, push the handle to the heater box in the direction of travel and close the heating caps.
As standard, the DKW is fitted with a rubber apron, which is attached with two-quick-fitting clips on the suction silencer, directly behind the radiator screen.
In the summer, the DKW is not to drive with its winter accessories.
The handbrake
In winter, the handbrake cable is exposed to an increased amount of water spray, therefore to avoid the danger of rust or damage, it is essential that the handbrake cable guide pipes are lubricated with a water-resistant grease. Nevertheless, we advise you to secure the car at temperatures of 0 and below, rather than by the handbrake alone by putting the car into first or reverse gear when parked (of course, with the freewheel locked).
The Battery
In winter your battery will naturally lose capacity due the colder temperature, along with increased use of your car’s lighting and windscreen wipers, so please ensure you regularly check that your battery’s condition and recharge when appropriate.
Snow chains
The DKW front wheel drive is very efficient. If you drive into the mountains during the winter, you should be able to find suitable snow chains. On some alpine roads chains are required by the police. However, in general the regular M and S tires recommended for DKW cars, which are available from all major tire companies, are sufficient for snow and winter driving.
Section Two - Technical Details
Motor
The workings of the DKW two-stroke motor with reverse scavenging

A fresh supply of oil necessary to protect the DKW motor is constantly supplied with the petrol, hence the term ‘petroil mixed lubrication.’
The carburetor

The Solex-Fallstrong Vergaser Type 32 BIC serves to form the fuel air mixture
The correct carburetor settings:
Air funnel – 27
Main nozzle 0127,5
Air correction nozzle 250
Idle fuel nozzle g 45
Idle air nozzle 0.8
Flow regulation screw – ca 1 ½ rotations to open
Starter fuel nozzle – gs 160
Starter air nozzle – ga 3.5
Mixing tube 20
Float needle valve 1.5
Throttle valve stop screw
The Air filter

The air filter cleans the fresh air sucked in by the carburetor. Its position is different in summer and winter. In the summer, as shown in the following image, the air filter bottom is opened.
In the winter, the filter pipe is inserted into the preheating plate, which is visible below. This gives the gasifier pre-warmed air.
The petrol pump

The Solex petrol pump circulates fuel to the carburetor. It is a pneumatic pump which is connected directly to the crankcase of a cylinder. During the compression stroke, the resulting negative pressure in the crankcase, acts upon a membrane in the fuel pump to suck fuel from the line and upon the power stroke inject the fuel into the carburetor.
The Radiator

Your DKW Meisterklasse has a high pressure radiator, for which an occasional temperature rise above 100C is not dangerous. It works with built-in, combined over and under pressure valve to prevent water losses.
The two cylinder motor has a thermosyphon cooling system. In this cooling system, a water pump is not required since the driving force required for the water circulation is caused by the difference in weight between the cold water in the radiator and the hot water in the cylinder. The heavier cold water always sinks down towards the cylinder. As the heated water then rises up towards the radiator, where it is cooled down again and continues the cycle.

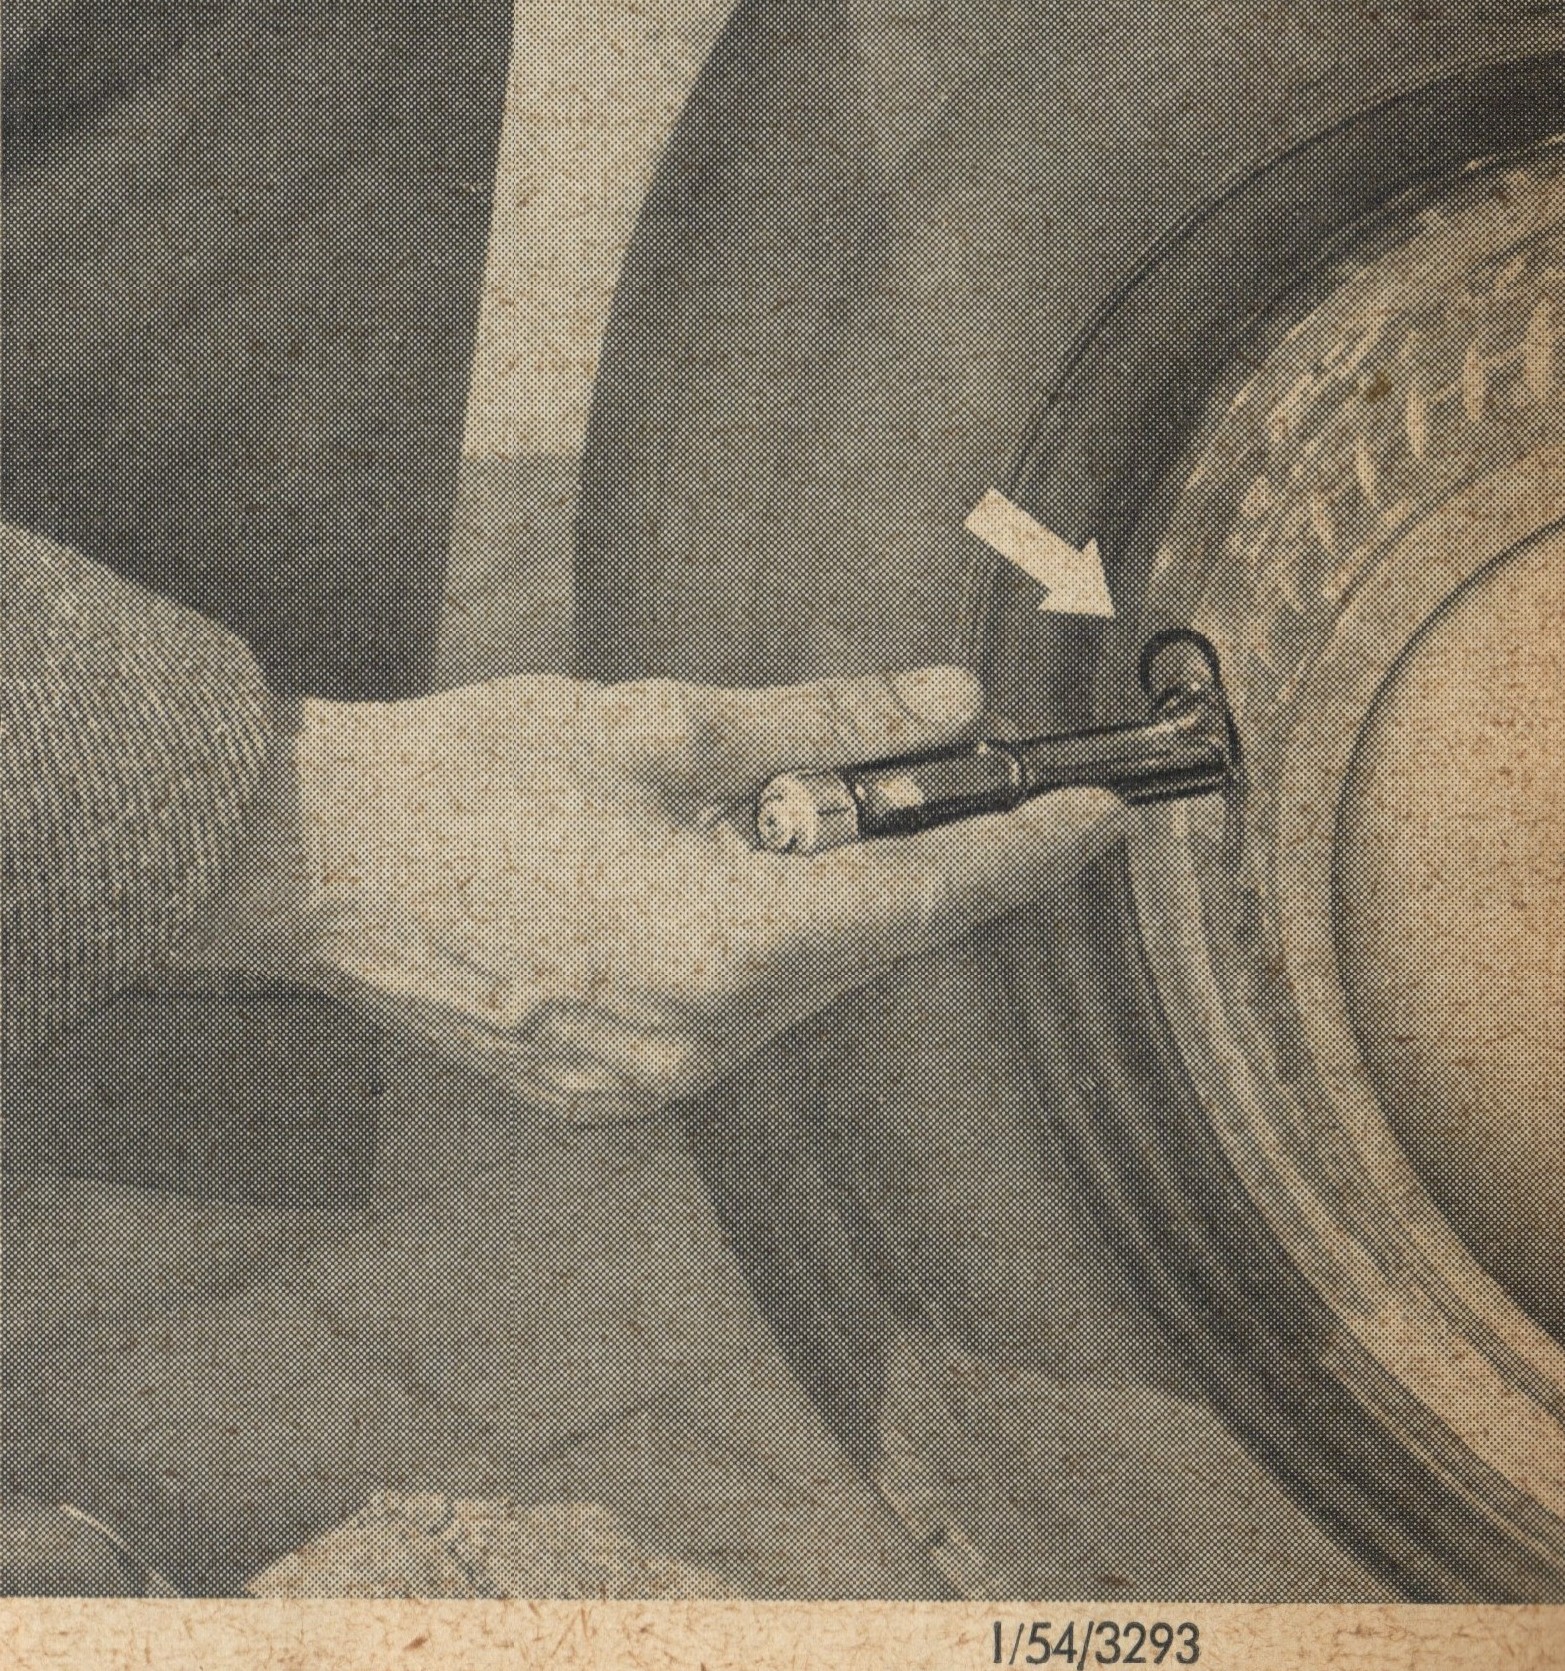
In the autumn or in the winter, if a change of the cooling water or addition of an anti-freeze, it is necessary to drain the cooling system. You will find the drain cock on the right under the cylinder block (see the picture on the right).
Radiator Fan
An electric fan is installed behind the radiator to ensure that in unfavourable conditions the water temperature does not get too high.
The four-speed gearbox

A single-disc dry clutch transmits power between the engine and the transmission via a duplex chain. A lockable clamp roller clutch is arranged between the motor and the clutch directly on the crankshaft.
The flow of fluid runs from the engine undercarriage to the sprocket, which is rigidly connected to the clutch bell. Power is transmitted via the single-disc dry clutch to the transmission main shaft and from there over the pre-shaft, depending on the gear engaged, to the differential. The 4th gear is not shipped directly, but directly switched. Except the 1st gear, all gear pairs are permanently engaged and run with the exception of the gear pair switched on empty. Insertion of a gear is effected by shifting the sliding sleeve on the main shaft or the feed shaft. This is provided with a claw offset, which is matched in the short toothing of the respective switched-on gear wheel, and makes the gear connect to the driving wheel. For the first gear, the same applies analogously, except that the gearwheel is displaceable on the preloading shaft.
The Freewheel

Between the engine and the clutch, directly on the crankshaft, there is a lockable freewheel. After the clamp roller system, this free-running interruption in the switched-on state forces the flow of power from the motor to the drive as soon as they remove the gas. This allows the engine to run as freely as it would have had to do according to the driving speed of the car. The car is not braked by the engine.

To switch on, the lever located to the left of the steering column is raised and pushed to the right until it clicks into place If, on the other hand, you deactivate the freewheel, the lever must be taken out of its rest and let go. A spring pulls it into its locking position.
When activating the freewheel, either on or off, you must push in the clutch and remove your foot from the gas.
The electrical Systems

The high-performance DKW Dynastart system in the DKW combines the function of a starter and alternator. It is amply sized with a 180-watt power at 6 Volt operating voltage. The bell anchor for the alternator and starter sits directly on the crankshaft and simultaneously acts as a starter crank. The 12-piece polling ring is mounted on an aluminum base plate on the crankcase. The controller and the distributor are connected to the power unit organically. A check of the adjustment is recommended from time to time at one of our DKW electro-services. (See customer service directory).

The idle voltage of the alternator is 7.8 = 0.1 volt

Tyre care
If you take a closer look at the tyres of your DKW you will find a color point on the tyre always over the valve. On the inside or outside or on both sides of the rim small lead weights are clamped between the edge of the rim and the tyre.
Their application is necessary for dynamic balancing. Tyre imbalances may significantly alter steering and driving safety, therefore it is important to always ensure that the front wheels are re-balanced and that the tyres are correctly fitted.
Changing wheel
You will the tyre jack in the accompanying tool bag in the rear luggage compartment, under the luggage shelf. The spare wheel is anchored by a central bolt. The jack is inserted with the guide piece into the sliding rail provided for this purpose. The jacking point is located on the underside of the body in the middle of the car.
On a sloping road the car must be secured against rolling by a stone or block. In the rim are pressed 3 straps for the impression of the wheel cap, into which the screwdriver can be inserted.
Pg 47
Advice when….
a) Replacing the headlight bulbs:
1. Use a screwdriver to undo the screw at the bottom of the headlight rim and carefully lift the headlight out. The bulb is a dual filament lamp.
2. Remove the bulb from the headlight socket by pulling the spring downwards, pressing the socket towards the back and pulling it out of its upper notch. Replace with a new bulb and reinstall the headlight appropriately.
b) Replacing the rear and brake lights:
First, after loosening the two slotted screws, the cover must be removed and the combined rear and brake light removed from the housing. By turning right or left, the bulbs are now brought into the position in which they can be removed from the socket. When replacing the bulbs always make sure that they are in good contact with the wiring.
c) Replacing dashboard lights:
The control lights in the tachometer, clock, engine temperature, fuel gauge, blinker and high-beam lights, are accessed as shown in the opposite diagram after removing the instrument panel. To do this, the 3 screws holding the instrument panel in place must be released and the panel gently folded inwards. You must also remove the speedometer cable from the rear of the tachometer before the panel can be moved freely. The bulbs must be removed from their individual sockets. Take care not to disturb the wiring and remember to reconnect the speedometer cable.
Fusebox

The individual circuits of the entire electrical system are housed with the 12 piece fuse box in the engine bay. The consumers of the individual circuits are documented in the overlay sheet glued in the cover of the fuse box and also in the fuse table listed in the circuit diagram in this manual.
Headlights

Height Adjustment is made on the right with arrow 2 designated screw. Turning this screw clockwise will make the headlamp insert higher and lower it by turning it to the left. This raises and lowers the light cone accordingly.

Setting the light field is done via the left hand screw designated in the picture as Arrow 1. By turning the screw to the right the headlight turns to the left and to the right by turning the screw to the left. This adjusts the light cone to the left or right. The headlights are adjusted according to the below picture. In the case of high beam, the light cones hit the middle of the cross. In the case of low beam, the bright / dark border of the light cone must not exceed the dashed line in the picture. The adjustment must be made with fully loaded (4 people) vehicle. If the adjustment is made on an unloaded vehicle, the light cone of the headlamps will lift with the weight of four passengers and the oncoming vehicles will be flashed even with dipped headlights.


Body and paintwork
The value of a proper car care must not be underestimated, because it ultimately determines the useful value of your DKW, also they will prepare the drive in your car more joy when he is well-groomed and outside in clean condition. You should therefore maintain your truck regularly and clean it at least every two weeks, depending on use and weather.
The procedure is as follows:
The dirt and dust are best removed with water. Prewash can be done with a sponge, drying with a soft leather. If there is not too much dirt, it is sufficient to spray all the sheet metal parts with DKW fog and then polish with a soft cloth. This agent cleanses and preserves. Reflective gloss of the car refreshes quickly and effortlessly through the subsequent high-gloss polishing with DKW. This paint care gives your DKW car a long-lasting glossy look and is therefore only 3-4 times a year necessary.
Special care for the DKW limousine with sunroof
The appearance and the lifespan of your sunroof depends largely on proper treatment and proper care. A wet top must dry in the tensioned condition and must not be left folded.
After driving on a dusty road, it is important to use a soft brush to out any dust and dirt as the sharp-edged dust particles can damage the sunroof and cause scuffs and other fabric damage. Brush only in one direction.
To remove stains, never use benzine or stain remover as these agents will attack the rubber layer between the fabrics. After large intervals or, in case of heavy soiling, the roof should be thoroughly washed. For this purpose a 24 gram bag of DKW Blankenol – the DKW preserving and cleaning agent - must be dissolved in a bucket of lukewarm water. The foaming liquid is applied to the cover which has previously been moistened with clean water and rubbed with a soft brush in one direction. Then the roof is to be rinsed with clear water. If the roof is heavily soiled, it is advisable to repeat the washing process.
After washing is completed rinse with clear water until the last remaining stains have been removed from the top fabric and the water drains off.
The freshly washed top must be dried in the tensioned state.
After washing the top, clean the paint on the car with clean water and then rub dry.


